

By Jesse Knox
Native prairie is not hard to establish. If the landowner follows the correct steps, the natives will come.
The Key 3 Rules in establishing native prairie are:
- Patience in the 1st year
- Patience in the 2nd year
- Patience in the 3rd year
It is always good practice to have diversity in your prairie stands. Switchgrass monocultures have become very popular and easy for landowners to establish. However, switchgrass such as Cave-In-Rock (CIR) variety lasts only 10-15 years and will have to be reseeded. It is good practice to have other grasses and forbs in a stand. The other grasses will replace grasses that die out, and the forbs are browse for deer and bugging for birds.
Most landowners plant native prairie for the Conservation Recovery Program (CRP). In CRP, the landowner takes highly erodible unproductive ground out of farming. The federal government, through the Farm Service Agency (FSA) will pay the landowner per acre with annual payments under a 10-15 year contract. The requirement is that the landowner must plant native prairie. Native prairie plants have outstanding roots that can help hold soils and are extremely attractive to wildlife.
If a landowner is participating in CRP or only wants to plant a few acres that doesn’t qualify for CRP, there are different Conservation Practices (CP) seeding plans a landowner can use as a reference when ordering a seed mix. As example:
- CP25: A standard tall prairie grass mix with forbs. This is the most common native prairie mix most landowners participate in when in CRP.
- CP2: A dominate grass mix consisting of 5 grasses and a couple forbs. This is a mix that would be recommended to landowners who wanted to do switchgrass, but bump up the switch in the mix.
- CP2Short: Similar to a CP2, but this mix is heavier in short grasses and more forbs such as little bluestem, Virginia wild rye, and side oats. This mix is geared for quail and pheasants, however deer will thrive in this mix too.
- CP42: This mix is geared for pollinators. Dominate in forbs and flowers with few grasses. The grasses are present in the mix is to help fire to carry through.
This is just an example of a few different prairie mixes. There are several others, but these are the most common ones.
Besides having patience there are three other keys to establishing prairie:
- Seed to Soil Contact
- Mowing weeds during the 1st and possibly 2nd year, 8-12” tall before weeds are above one’s knee
- Burn every year or every other year to maintain healthy stands of prairie
Prairie grass seed is light and fluffy (besides switchgrass which is a hard seed) while prairie flowers and forbs are small. Some so small they can fit on the end of a pen.
Due to the nature of prairie seed, it is critical that the seed lands on top of the ground and makes soil contact. ¼” deep is the deepest prairie can go. Any deeper, consider the seed terminated. Residue (dead plant material or shaft from harvest) can greatly hinder seed to soil contact. Thick grass residue and sod is the greatest challenge to establishing a healthy native prairie stand. Since native prairie seed is fluffy and light, it does not drop into the ground like an oat or brassica seed. It floats to the ground. It can get easily hung up in residue.
One would think a no-till drill can solve that issue. However, an issue of “pinning” can become a challenge. Pinning is when the residue is being pinned into the row of the drill inhibiting the seed to coming in contact with the soil. Consider the seed dead if this happens. Also, the residue can become clumped into a row again causing the seed to not come in contact with the soil.
A drill operator has no choice, but to continue lowering the drill... however the seed can easily become buried. Again the seed will be terminated. What is the ideal scenario for native prairie to be established? Soybean stubble, a baled hay field, or a burned field is the ideal situation for a native seed bed. However, there are multiple strategies and scenarios to run through which we will begin now:
Soybean Stubble
A soybean field is any drill operators dream. Soybean stubble is light enough for the coulters to run through without the seed becoming hung up in residue. Also, most bean fields have had a field finisher ran across in the spring before planting so the field will be smooth and clean.
No-till drilling prairie into soybean stubble in the fall is every drill operator’s ideal time. However, fall can be an issue for native prairie grasses. Due to the nature of the light fluffy seed, even if the seed has been drilled directly on top of the seed bed, the freezing and thawing nature of winter can actually push the seed deeper than intended. A seed may be on top of the soil by November, but by March might be a half inch deep and again terminated.
If winter is mild, then the prairie stand will be safe. However, if frequent freeze and thaw occurs the seed will suffer.
Pollinator seed, since it is smaller and hard, has had phenomenal success. The hard seed needs the stratification (when seed goes through a freeze thaw process) to encourage germination. Drilling pollinator seed into soybean stubble is the ideal situation for success.
However due to time and money, sometimes drilling prairie grass in the fall is the only way, which is acceptable on all sides.
If the landowner wants a successful stand, the landowner can wait to drill in the summer from May to early July. However, an application of glyphosate will be required. 2 quarts/acre is recommended. Waiting for a flush of weeds to emerge and then spraying when weeds are 6”-10” high would be ideal. This will take future pressure off of the prairie stand and less mowing trips.
Corn Residue
Corn leaves behind heavy residue. The high amount of residue can cause pinning and seed becoming hung up in the corn residue. Depending on the land owner, corn may be raked and baled or burned. The field can be worked, however the high amount of residue can still become a problem after tillage. If working the field is the only way, a culti-mulcher must be used to create a firm seed bed. A vertical tillage tool can also be used to fluff and flip the residue so there is more seed to soil contact.
If the corn residue is being baled, a fall seeding may take place. Burning in the fall is also an option, however fall burnings can be difficult. Mainly due to less warmer days, residue takes longer to dry. Sometimes a thin layer of thatch or residue will not burn because it won’t dry.
If a spring seeding is to take place, burn the corn residue, wait until weeds are 6-10” high and apply glyphosate at 2 quarts/acre. Drill the native prairie after spraying.
Alfalfa or Hay
Sometimes a hay field is eligible for CRP or the landowner wants to take a small unproductive hay field and turn it into prairie. The ideal protocol is to bale the hay in from mid to late summer. Wait for green regrowth of 4-6” and spray 2 quarts of glyphosate per acre. The next spring, repeat the same glyphosate mixture. It may need to be sprayed again if brome or fescue is present, but normally spraying in the fall and spring should kill most of brome and fescue.
In CRP, the Farm Service Agency (FSA) has issues with a landowner baling hay before seeding. However, you can bale before the dates of beginning the process. Normally, if baling is done before August 1st a landowner can bale the hay off before any conflict of interest arises.
Now, if for some reason the baling cannot take place, a disc mower can be used, and then the hay can be raked into bigger windrows. The landowner can then burn the windrows to get the hay off the field.
If that tactic is not an option, mow the hay with a batwing mower in August. Wait to the green growth emerges from the residue, spray the hay in mid-September, burn the residue off in the spring, spray again when green growth is 4-6” tall, and finish drill the native prairie in mid-May or June.
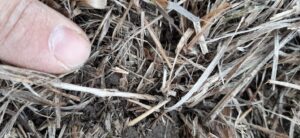
Ex 1: At the end of my finger is a little bluestem seed. It will not make it because once germinated, its roots will not make soil contact and die. This is due to pinning, where the residue is too thick for the drill to cut through. The drill coulters end up pinning the residue into the rows.
Ex 2: Another example of too much residue on top of the seed bed.
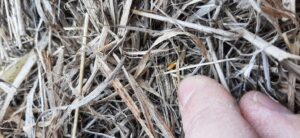
Ex 3: There is about 3-4” of residue on top of the seedbed. This is an absurd amount of residue. If you lower the drill any deeper, you will bury the seed too deep and it will not grow. This is why burning your residue increases native establishment success rate substantially.

Existing Prairie
Drilling into existing prairie can be simple. Depending on the stand, a landowner can simply burn the prairie off in the spring and then drill in the summer.
It depends on the prairie what will need to be done. If the prairie has become over run with fescue, brome, invasive weeds, ect....then use the procedure of:
- Mow in August
- Spray in September
- Burn in the spring
- Spray again
- Drill in mid-May to June.
Sod or Fields gone Fallow
The most typical and common scenario many landowners face. Either a fallow field a landowner wants to back into prairie or a poorly taken care of CRP field reduced to fescue and scattered brush that has to be removed.
The standard procedure shall take place to establish a healthy stand of prairie:
- Mow in August
- Spray in September
- Burn residue off in spring
- Spray again after burning when residue is 6-8” tall
- Drill in mid-May-June
Will Tillage Be Necessary?
Most native prairie seedings will not have to be tilled. Most will be no-till drilled. However, a field can be so rough it can actually cause seed to come out more than necessary. Some seed can become buried. Rule of thumb: if a landowner stumbles and trips every 3 feet the field will need to be worked.
If tillage is necessary, treat the field as you would:
- Mow in August
- Spray in September
- Burn residue off in spring
Disc and culti-mulch after burning.
Spray again after burning when residue is 6-8” tall
Drill in mid-May-June
The culti-mulcher is an essential tool to firming the seed bed. A culti-mulcher breaks up clods, smooths out dips, and firms the seed bed. A firm seed bed is essential for native prairie to become established. A firm seed bed is as important as a firm strong foundation for a house. A house will not last long on a poor foundation nor will any seeding of any type.
Native Prairie Maintenance
During the first year for native prairie, mowing will be essential. Typically, a landowner will wait until weeds are almost to their knee. The mower will be ran 8-10” high. The reason for the mower being higher is too limit the amount of residue that could suffocate the seeding.
On average two mowing’s will suffice, sometimes three for the first year. More mowing may have to take place during the second year.
By the second or third year, burning will need to take place. If a landowner is committed to their native prairie: BURNING IS A MUST. These native prairie species have evolved with fire. Fire is essential to clean up the old dying native to allow more sunlight to reach new young natives.
If a landowner is not committed to burn: native prairie is not for the landowner.
If there are multiple fields of native prairie, it would be ideal to burn field A one year and field B the second year. Even though native prairie needs to be burned, upland game birds and deer still need cover to nest and bed in. If field A is burned, but field B is not: field A will provide browse and bugging for birds and deer, while field B is bedding and nesting. Those will then rotate the next year as field A will not be burned and field B will be burned. Similar to a crop rotation, but a burn rotation.
Occasional Inter-seeding
Sometimes a landowner can do everything right, but sometimes soil types can be a challenge for native prairie. Native grasses do not thrive on white oak clay soil as an example, they will grow and survive, but that soil type is not ideal for tall native grasses, but there is a lot of success across the country on this soil type! However, sometimes the native seed just doesn’t take. Observe the field over the years and see what is there. If there is not as many native species as there should be by year 3, burn the field and inter-seed in year 4.
Occasional Spraying or Spot Spraying
Fire will rejuvenate and clean your prairie. It will burn most cedars, trees, and other species. However, it is recommended to scout your prairie in the spring and early summer to look for invasive species such as Canadian thistle. Also other unwanted species such as ash, black locust, or silver maples can withstand fire and survive. Most invasive species can be cleaned up with an herbicide called Crossbow, but it is recommended to use more powerful herbicides such as Grazeon NXT or Remedy.
IMPORTANT NOTE: most native seeding’s have NATIVE thistles in the mix. Native thistles have a silver color on the backside of their leaves. Native thistles will not have a seed head until October. Native thistles are a critical food source for monarch butterflies and migrating bird species such as Iowa Gold Finch.
Invasive species will have seed heads developed in less than two months and grow in groups. Native thistles can grow in multiples, however will either fade out or not come back the next year. Grazeon is recommended to kill invasive thistles.
In the end
Establishing prairie or restoring prairie is a passion project. You do not, “plant it and forget it”. You are restoring an ecosystem. Wildlife is now dependent on you to maintain this prairie. It is extremely rewarding to see the amount of game birds and whitetail deer will benefit even from a few acres.